描述
Summarize:
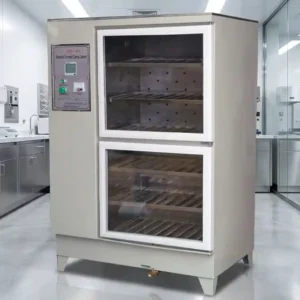
HBY-40B Standard Concrete Curing Cabinet has feature such as uniformity of inner temperature and humidity, high precision, no water drop from top.
Structure :
- box body consist of inner, middle and out layer, out crust use cold-roll steel sheets bending to mould, middle layer use polyester expanded plastic, frame made from stainless steel. This cabinet has high ability of bear rust.
- Temperature and humidity controller by using integrated circuit has the featurers such as high distinguish, easy adjust, high precision and so on.
- Refrigeration system by using direct cooling compressor, pipe set evaporator, visible condenser can improve use age.
- Heating by using U tube can equably heating.
Principle:
When temperature inner higher than enactment value, temperaturer controller will do refrigeration, when it lower, then controller will do heating, repetitive cycle keep temperature and hunidity in the range of enactment, in order to protect relay, before equipment leave factory we set temperature up limit is 21℃, low limit is 19℃, make relay change in the range of ±1℃.
Parameter
- temperature control error: ±1℃
- humidity control: >92%
- power voltage: 220V±10%
- frequency: 50HZ
- compressor power: 125W
- heater power: 500W
- Effective volume:
20 Type(L×W×H): 575×540×795(mm)
40 Type(L×W×H): 600×550×1380(mm)
- Hunidity adding by using ultrasonic humidifier make sure hunidity >92%.
- Temperature range: 0℃-50℃
- Sensitivity of temperature control: ±0.5℃; sensitivity of humidity control: ±2%RH
- Accuracy of temperature control: ±0.5℃; accuracy of humidity control: 5%~7%RH
- Low limit and up limit of temperature and humidity can be set by user freely.
- Delay of up limite set range: 0-9.9min.
Working principium:
The meter changes the equivalent voltage signal of dry/wet temperature sensor to respective figure signal, and then use single flake microprocessor to deal with the figure signal to display and control.
In order to take effective protections to the refrigeration system, the meter specially sets time-prolongable process to ensure the time interval between the two refrigeration boots, which protects the normal task of the compressor.
Setting of working parameter –
Before leaving the factory, the parameter of the meter has been set 20.0±1℃ for temperature and 92%±2% for humidity. Therefore, once you open the machine, it will work normally. If you want to modify the settings, please look carefully at the reference book and do as the following example.
Under working circumstance, press the key “ setting” for about 5s to enter the setting state, and press “exit” to secede from the “exit” state to working state. Continuously press “setting”, it will show each parameter in turn. If you want to display or modify the concrete numerical value of the certain parameter, just press “▲” to modify the parameter after the parameter is appeared. At that time, the first one from right glitters, and press “▲” to input the figure. After modifying, press space and skip to modify the next. Set an example: you want to set the control value of temperature at 20.0±1℃, and the humidity at 92%±2%.
a). Press “setting” for about 5s until the first one from right glitters of humidity window, and then press “▲” to modify the parameter. After modifying, press space and the second one glitters, and adjust the figure at 92.
b). Press “setting” until the first one from right of upper limit temperature window glitters, and then press “▲” to modify the parameter. After modifying, press space and the second one glitter. After you modify it, press space again and the third one glitters, and adjust the figure at 21.0
c). Press “setting” until the first one from right of the lower limit temperature window glitters, and then press “▲” to modify the parameter. After modifying, press space, and the second one glitters. After modifying, press space again and the third one glitters, and adjust the figure at19.0 and then press “acknowledgement” to exit.
3). Maintenance and attention
- avoid acid, alkali, salt and acutely vibrant environment
- ensure all the connections exactly connected , not allowed flexible and rust
- replace the gauze for humidity sensor.
*Use special humidity gauze or degrease gauze (drugstore are sold).
*clear the hands before change the gauze
*the thickness of the gauze should not surpass one and a half of the humidity sensor. Get one cotton thread from the gauze and knot at the head and the tail. There should be no space between gauze and sensor.
*the water used in humidity sensor should be distilled water or purified water, the other side of the gauze which used to pack the sensor should immerge in the water.
*after using for some time, or the sink , the gauze is covered by dirt or oil stain, clear and replace them in time, otherwise, it will lead to the value on the high side.
4)the meter should be installed in draftiness. If no wind, consider adding the fans with proper power. Because no wind will lead to the high side of the humidity. Pay attention to examine the fans regularly to make sure it runs normally.
5) the meter appears to be abnormal once in a while, just turn off the electrical source and reset the machine. If still abnormal, you should ask the technicist to overhaul it.
6)If there are catastrophic failure, just bring it back to the factory for mending.
7) Under normal circumstance, the warranty is 1 year.
8)when making the order, please explain it if you want to have the function of print.
9) the meter adopts computer CMOS chip, require the 220 voltage be stable and clean. If the load it controlled has strong impulse(inductance-oriented load generally),it should connect 0.1uF/630V CBB capacitance at the two sides of the load to minish interfere so as to ensure the normal work of the CPU. The connection from outside should make proof-interfere disposal. Never connect wire and wire directly, and you should introduce them from the input, and concatenate 10A fuse to protect the meter from the error in connecting load from outside.